Deploy Model
Overview
Model deployment in Bridge lets you serve machine learning models as inference APIs so that applications and services can call them for predictions.
As a Tenant Admin, you can deploy models from Bridge model catalog, configure GPU resources and rate limits, and expose models via endpoints for tenant users and applications.
This guide covers:
- Selecting a model from the catalog and starting deployment
- Configuring the model name, endpoint, GPU type and count, and rate limits
- Monitoring deployment until the model is running
After deployment, tenant users can test the model in the Model Playground.
Prerequisites
- Tenant Admin access — You must log in as a Tenant Admin to deploy models from the catalog.
- Model catalog — The model you want to deploy must be available in Bridge model catalog (see Prepare Model below).
- Endpoint (optional) — For some models you may need to create or select an endpoint (e.g., an LLM endpoint) before or during deployment.
Prepare Model
Model Requirements
Models should be:
- Serialized in standard format (SavedModel, ONNX, etc.)
- Packaged with dependencies
- Tested locally
- Documented with input/output specs
Supported Formats
- TensorFlow SavedModel
- PyTorch TorchScript
- ONNX models
- Custom containers
Model catalog
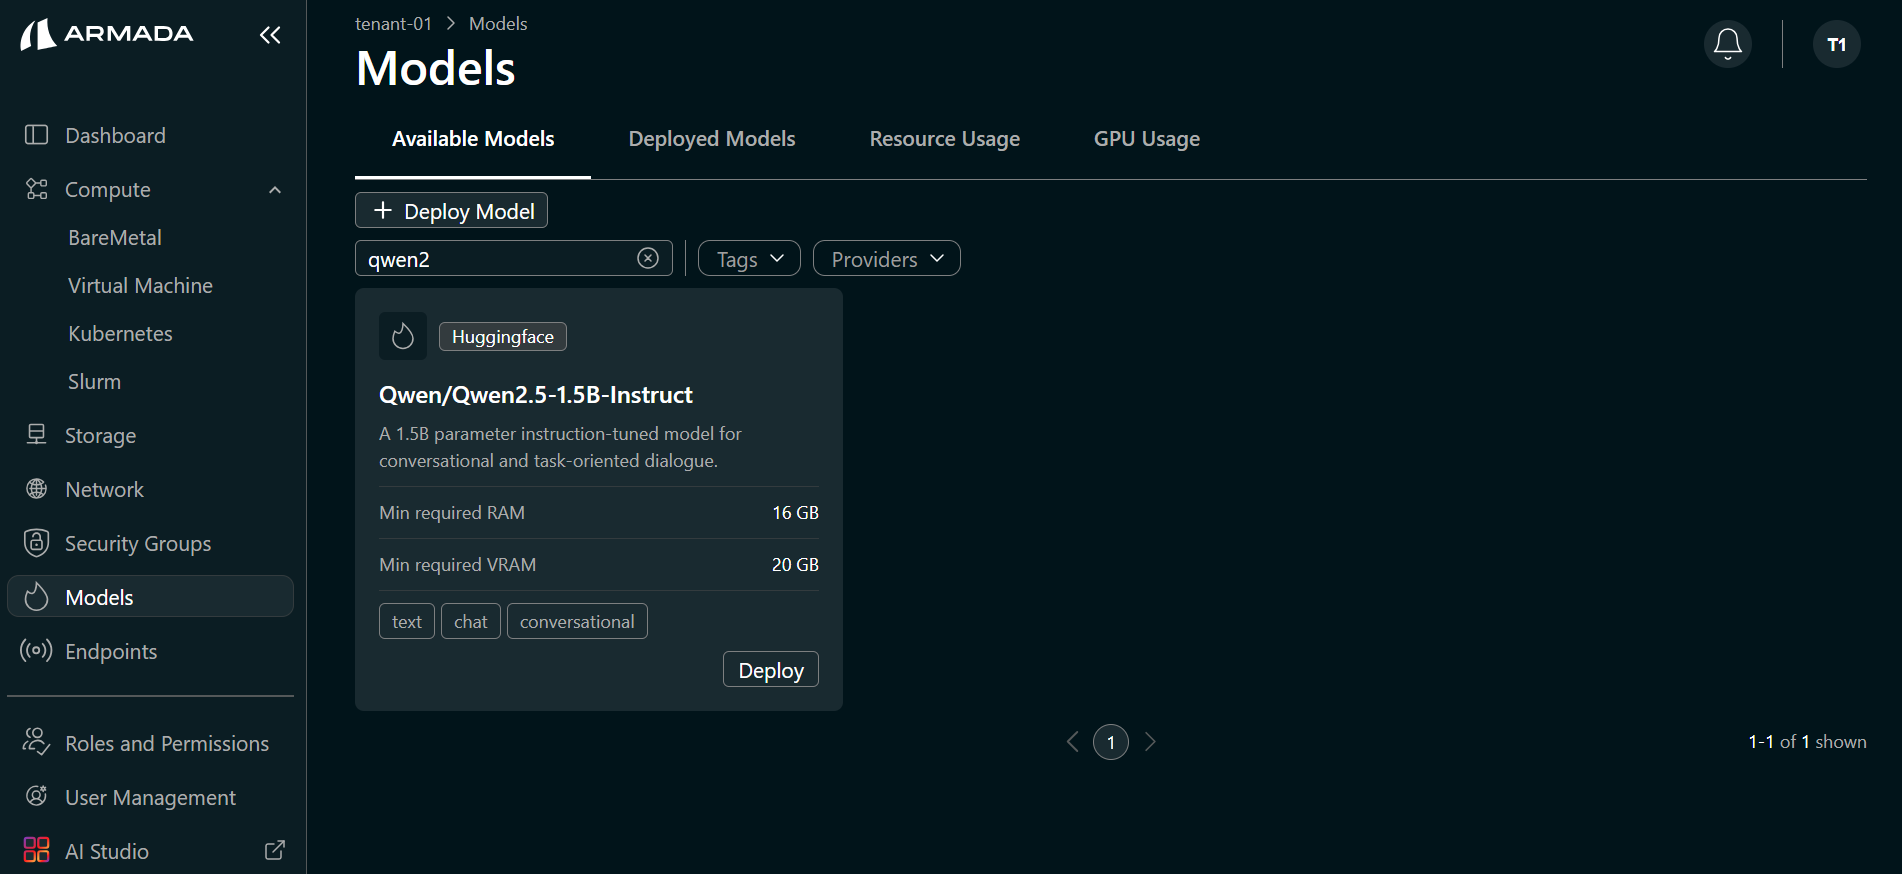
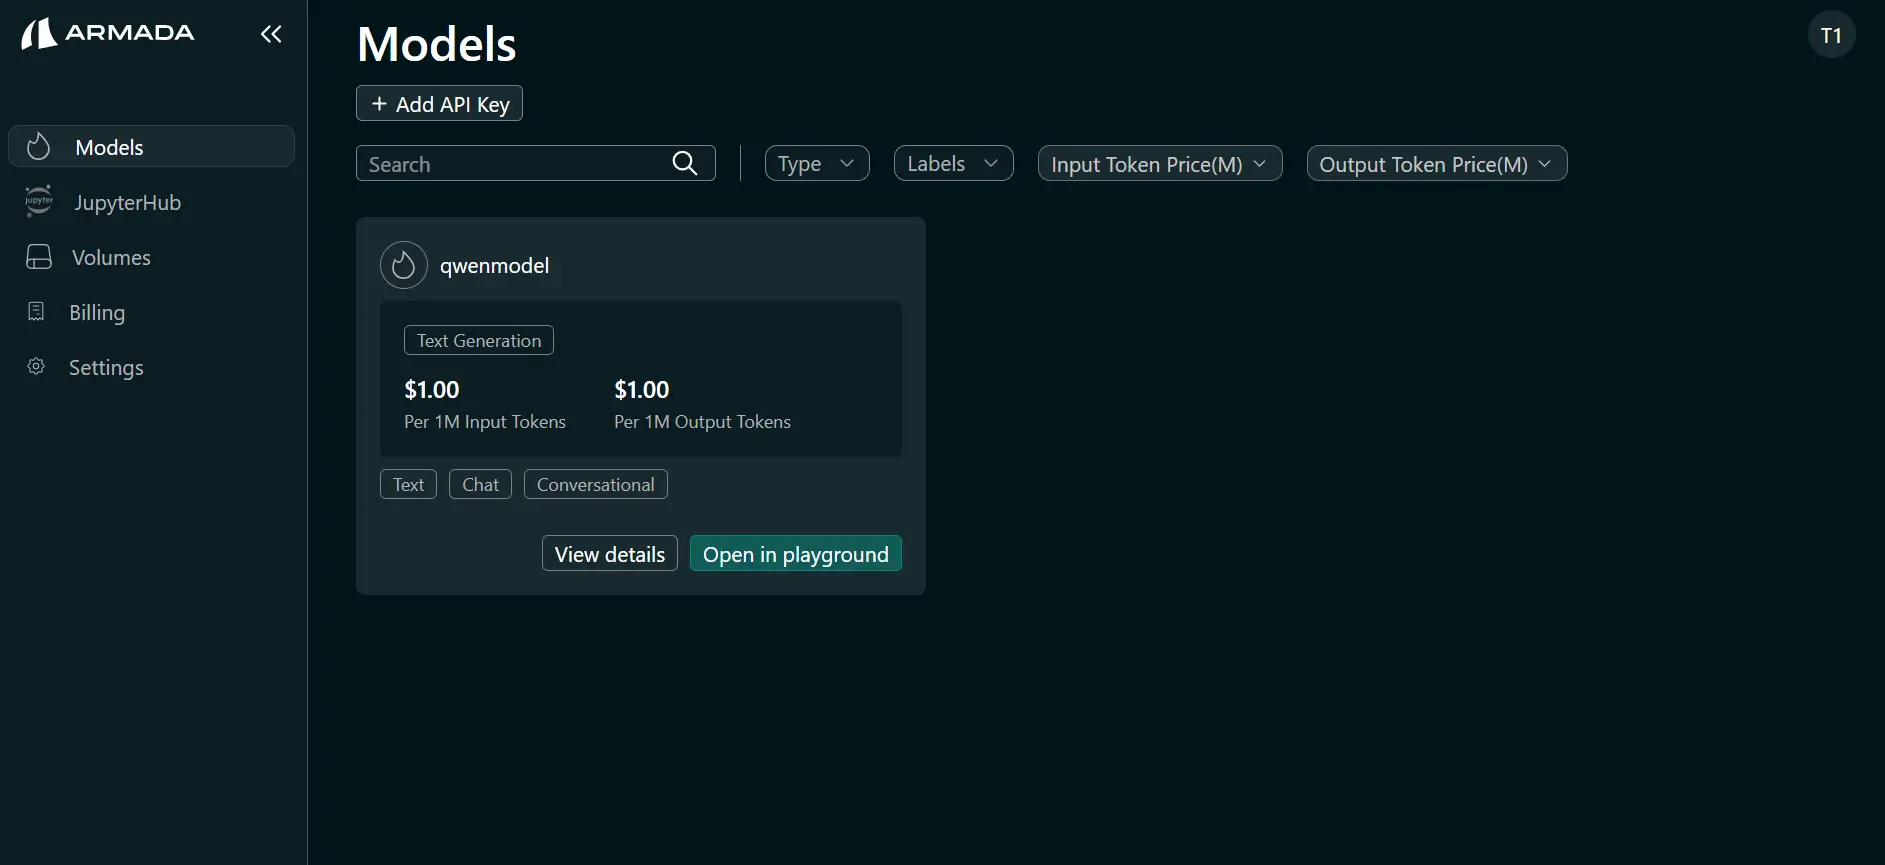
Models are deployed from the Bridge model catalog. Bridge provides default models from Hugging Face (e.g., Qwen/Qwen2.5-1.5B-Instruct) and NIM (e.g., meta/llama-3.2-3b-instruct); you can deploy these directly from the catalog. The Available Models tab in the Models section lists all models that can be deployed. If the model you need is not listed, contact Bridge Super Administrator to add it to the catalog.
Model requirements (for catalog models)
Models in the catalog are typically:
- Serialized in a standard format — For example, SavedModel, ONNX, or TorchScript, so they can be loaded and served by the runtime.
- Packaged with dependencies — Any runtime or framework dependencies are included or specified.
- Documented — Input/output specifications and usage are documented so you can configure deployment and test correctly.
The catalog may include models in these formats; the model card or catalog entry indicates the format.
Credentials (if required)
Some catalog models (for example, from Hugging Face) require credentials to pull the model or access gated assets. Have the following ready if your model needs them:
- Hugging Face token — For models that require Hugging Face access; you will enter this when configuring the deployment (see Step 2).
If you do not have a Hugging Face token, create one from https://huggingface.co/ (sign in or sign up, then create a token in your account settings).
Deploy Model
Step 1: Select Model
- Log in to Bridge as a Tenant Admin.
- In the left sidebar, open Models.
- Open the Available Models tab. All models available for deployment are listed.
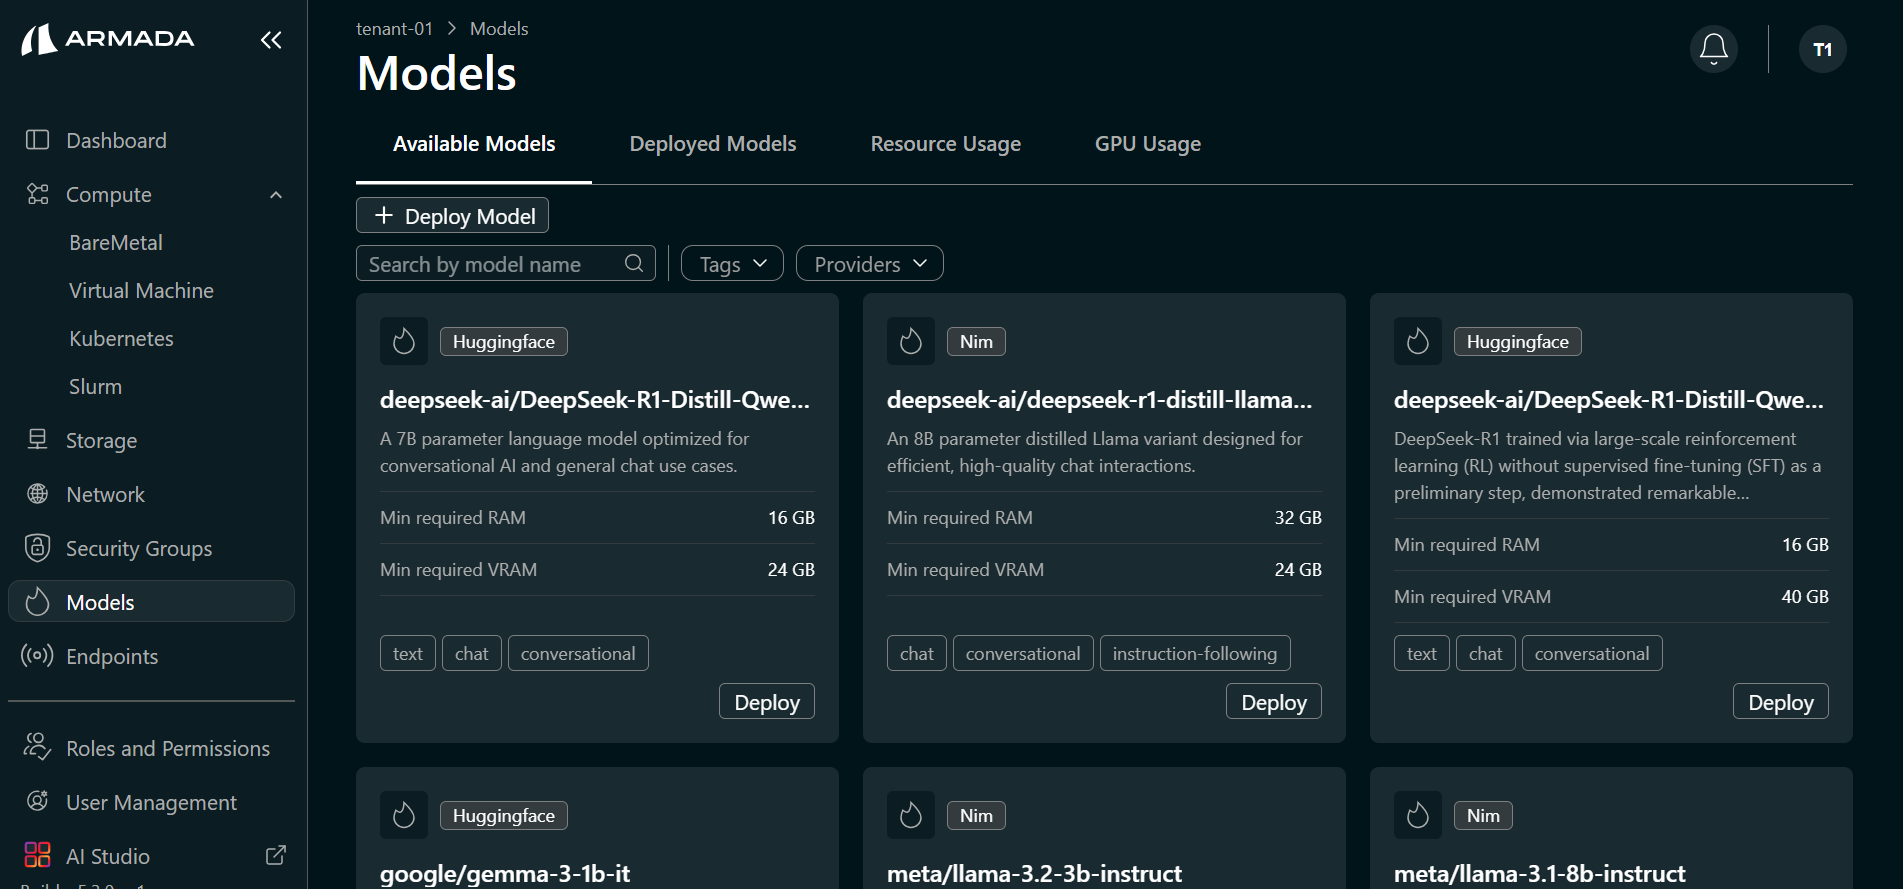
- Hover over the model you want to deploy (e.g., Qwen/Qwen2.5-1.5B-Instruct). Click Deploy Model when it appears.
Step 2: Configure Model and Endpoint
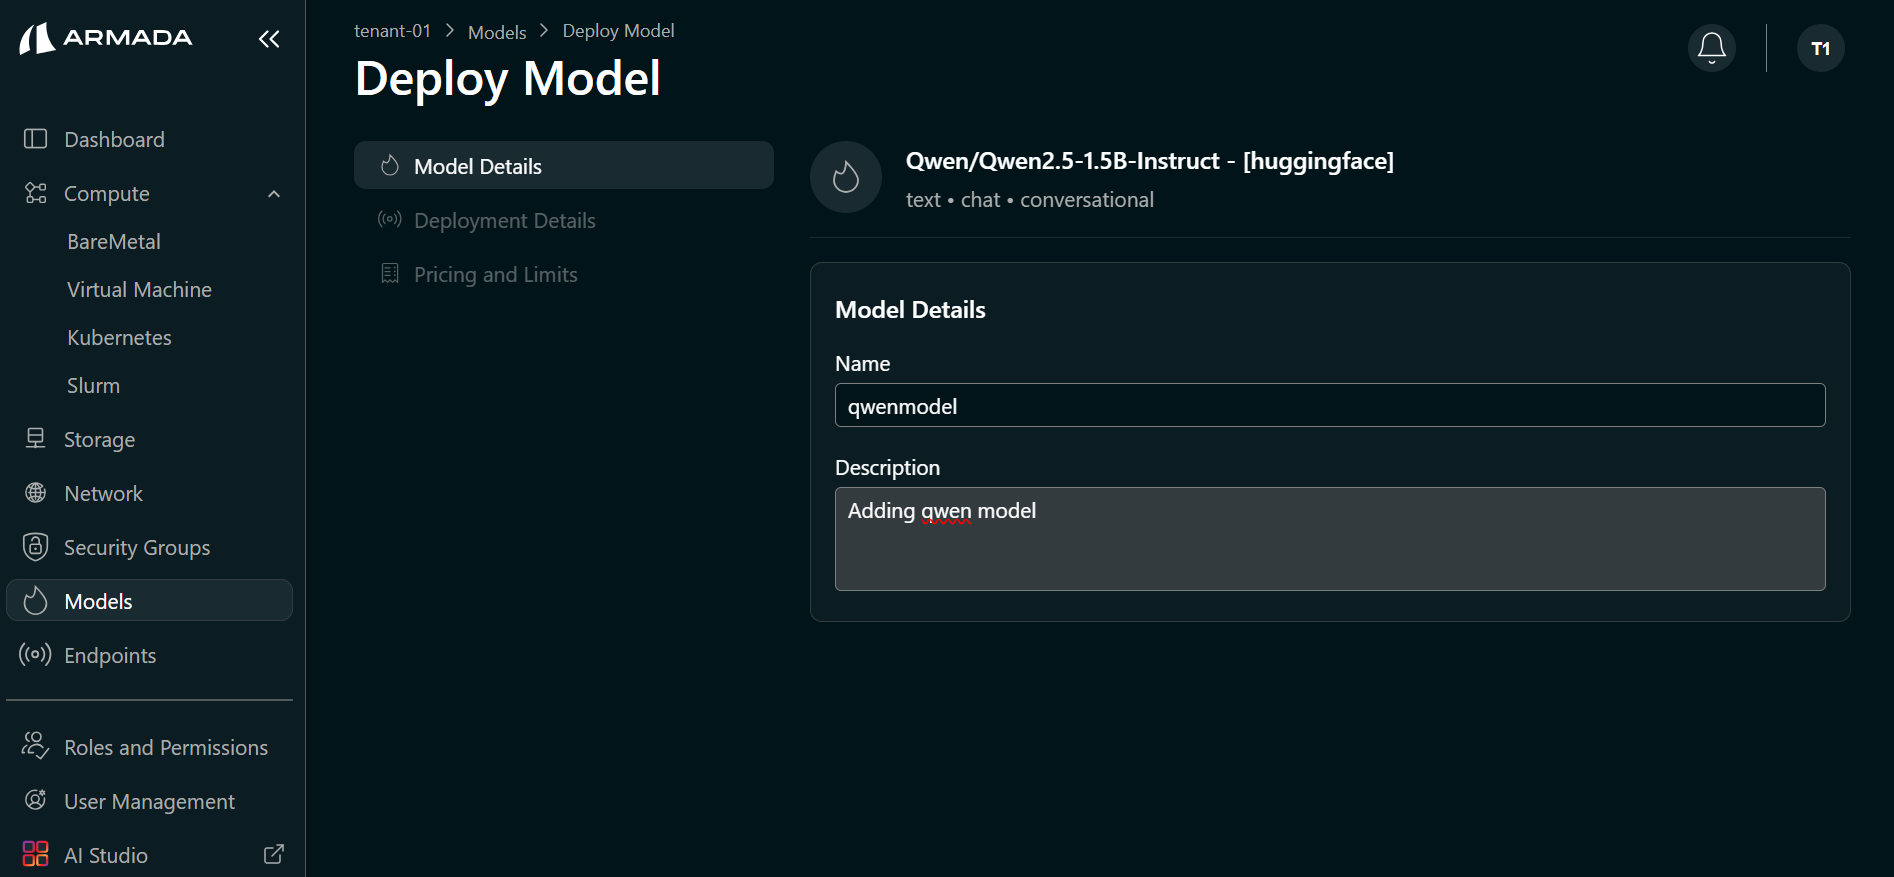
- Enter a Model name (e.g.,
qwenmodel). The selected catalog model (e.g., Qwen/Qwen2.5-1.5B-Instruct) is auto-selected. Click Next.
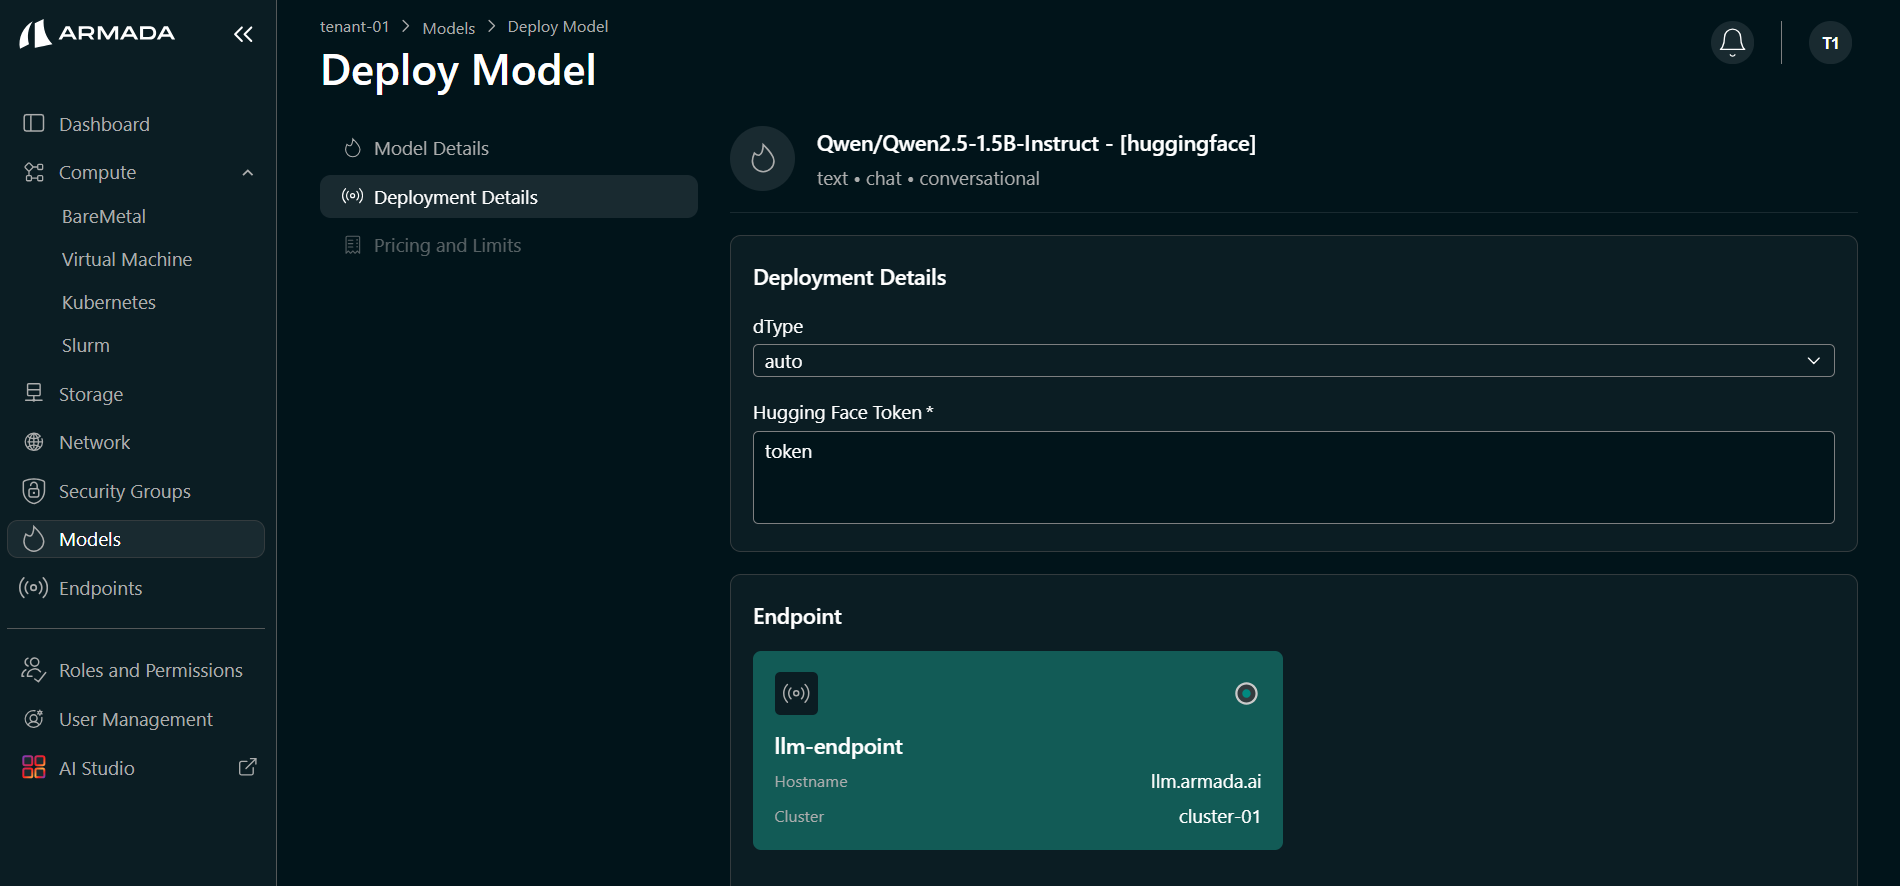
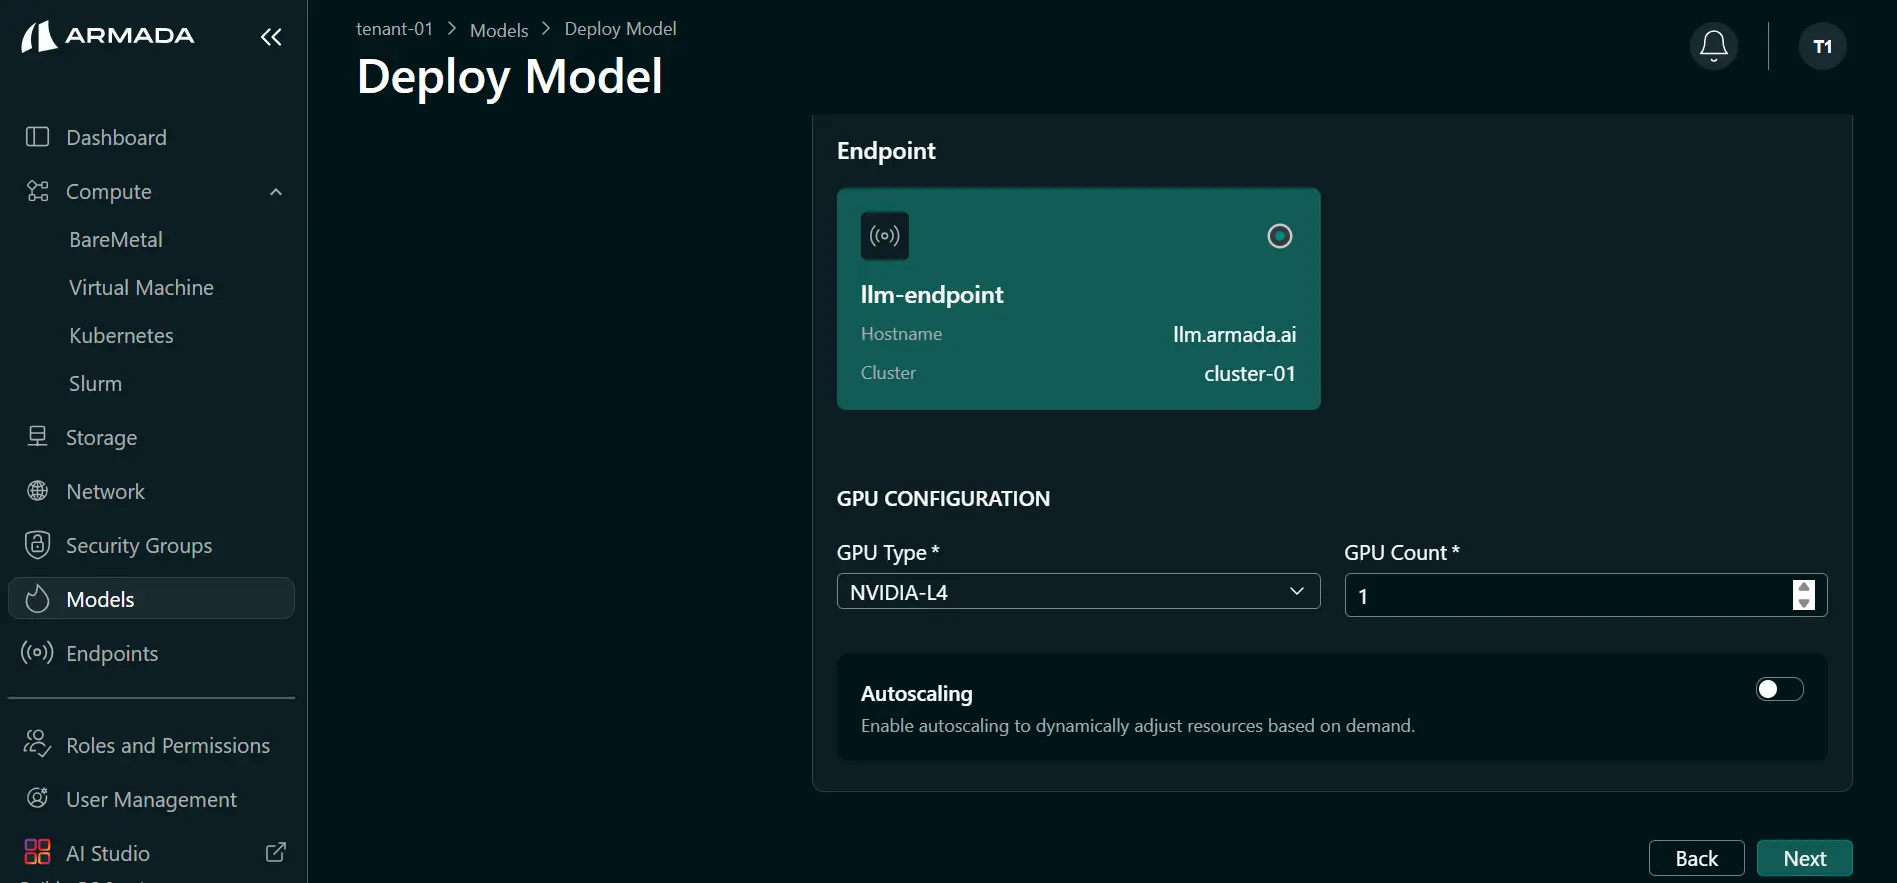
- Enter your Hugging Face Token if the model requires it. Select or create the Endpoint (e.g.,
llmendpoint) that will expose this model. Click Next.
- Select the GPU type (e.g., L4) and set GPU count (e.g.,
1). Click Next.
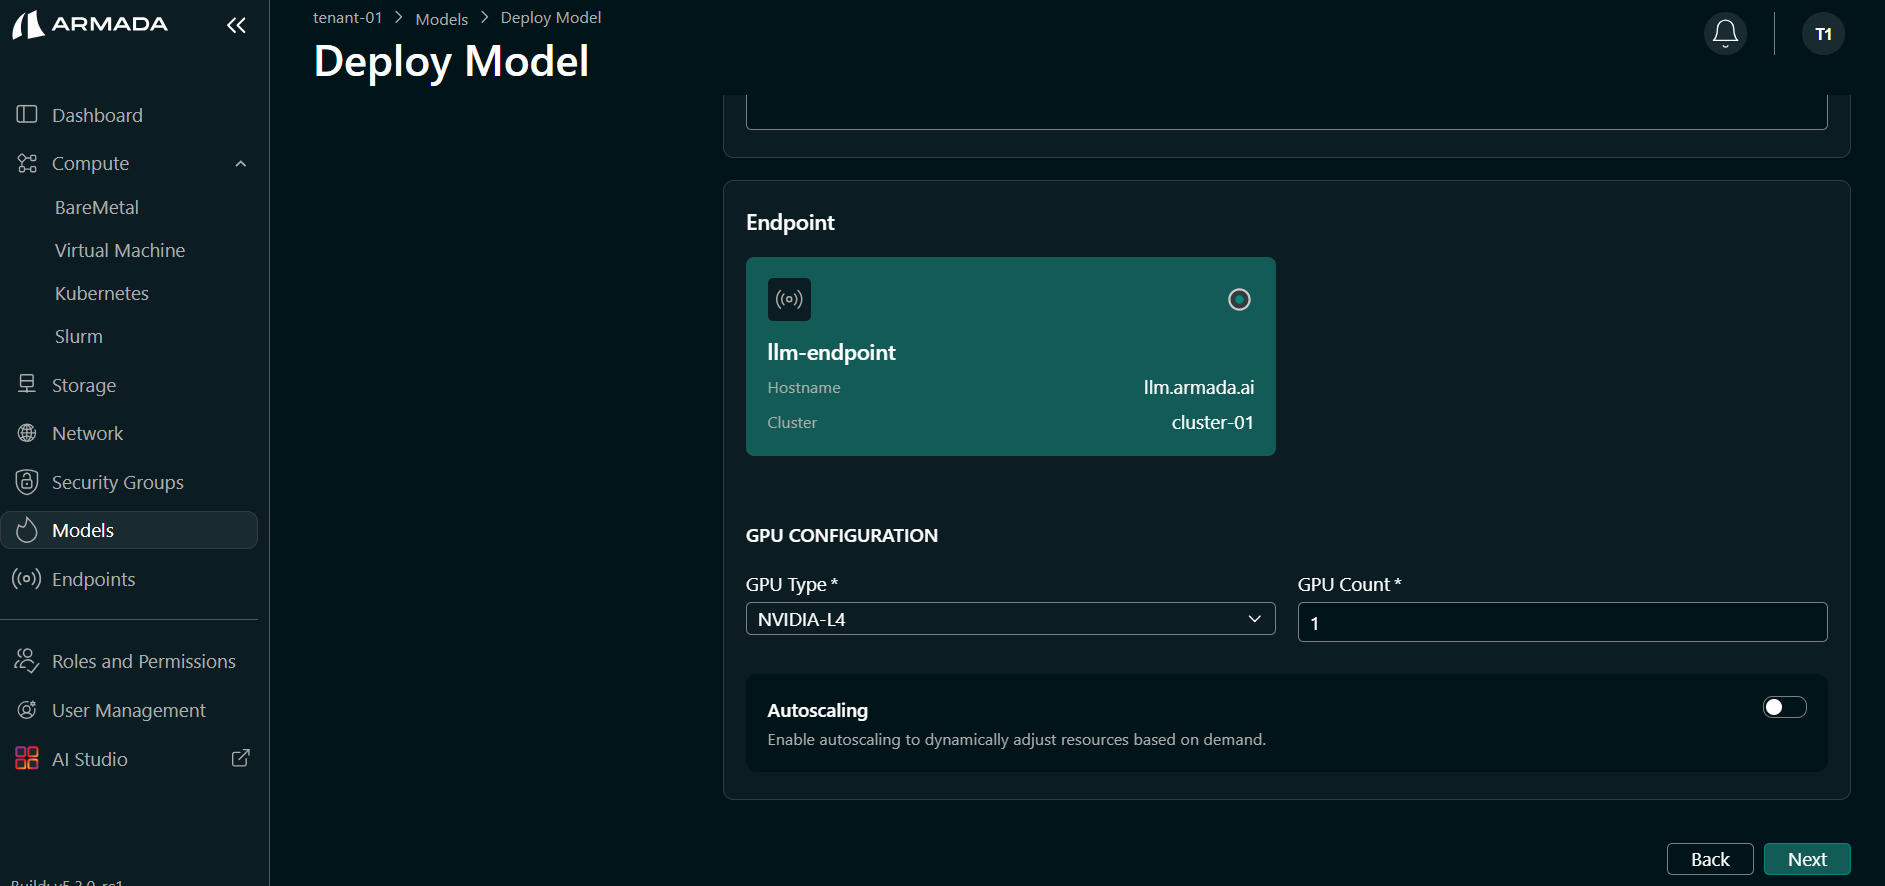
-
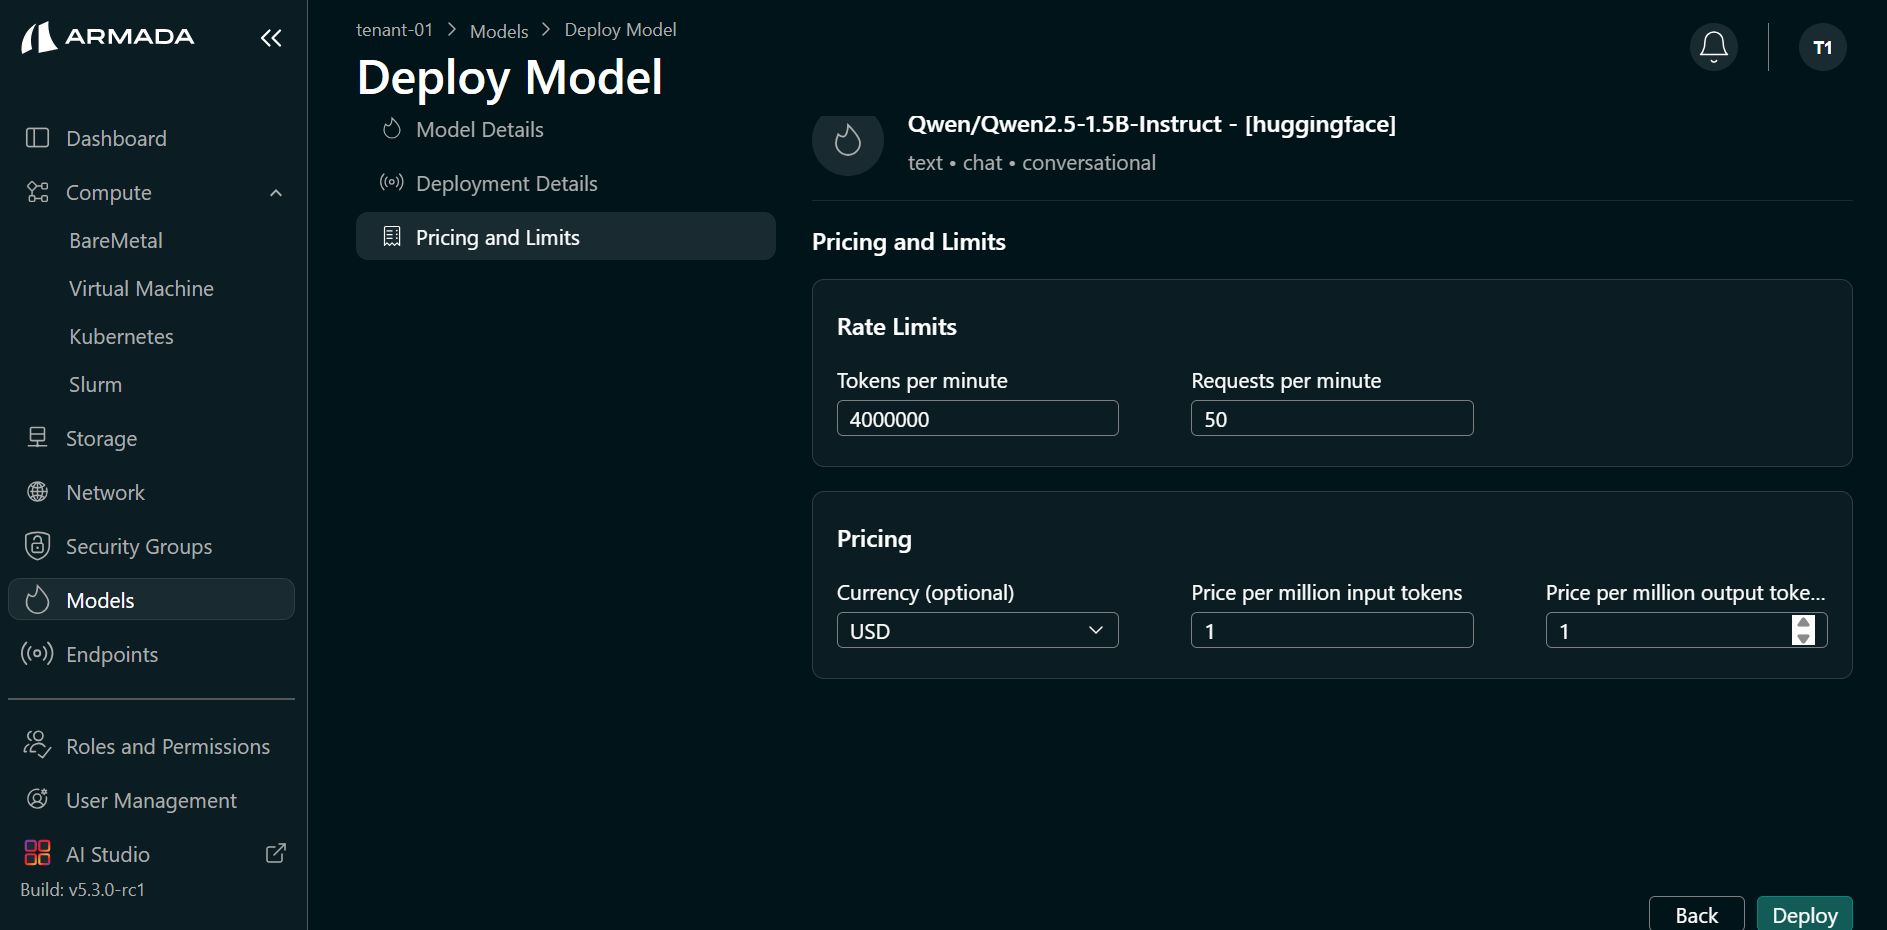
Set rate limits and pricing as required, then click Deploy.
Example values:
- Token per minute — e.g.,
4000000 - Request per minute — e.g.,
50 - Currency — e.g.,
USD - Price per million input tokens — e.g.,
1 - Price per million output tokens — e.g.,
1
- Token per minute — e.g.,
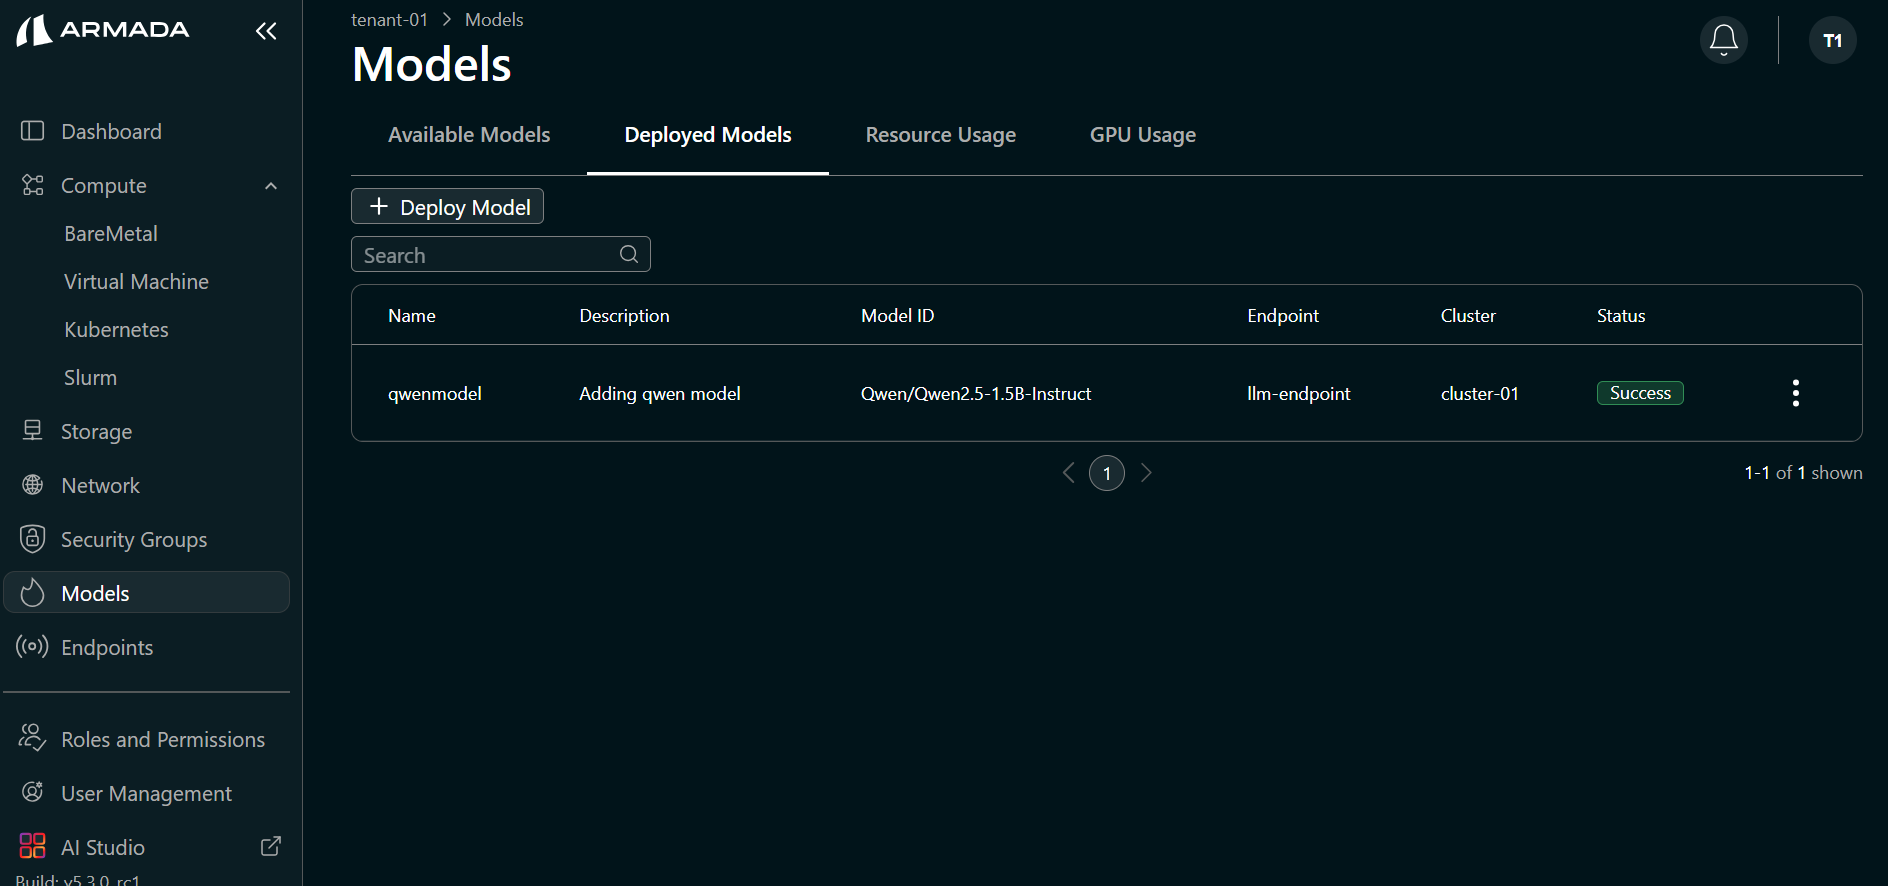
Step 3: Monitor Deployment
Deployment typically takes 10–15 minutes.
- Watch the deployment progress in the UI. The model status will initially show Processing.
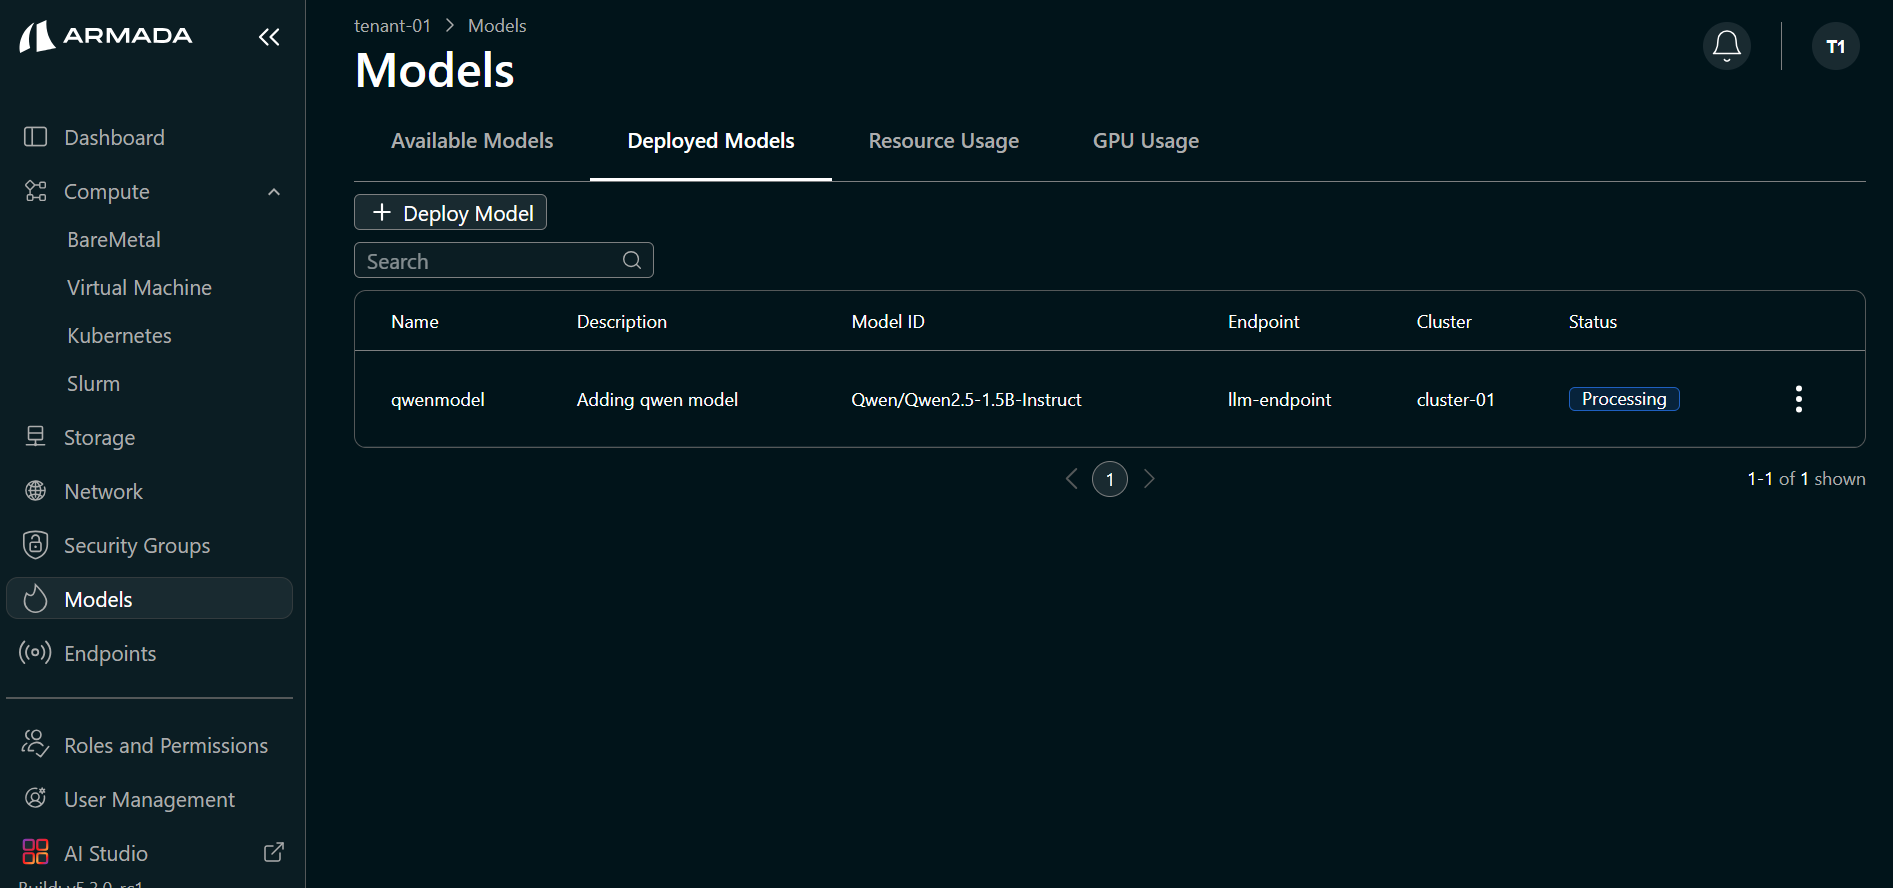
- When deployment completes successfully, the model status shows Running.
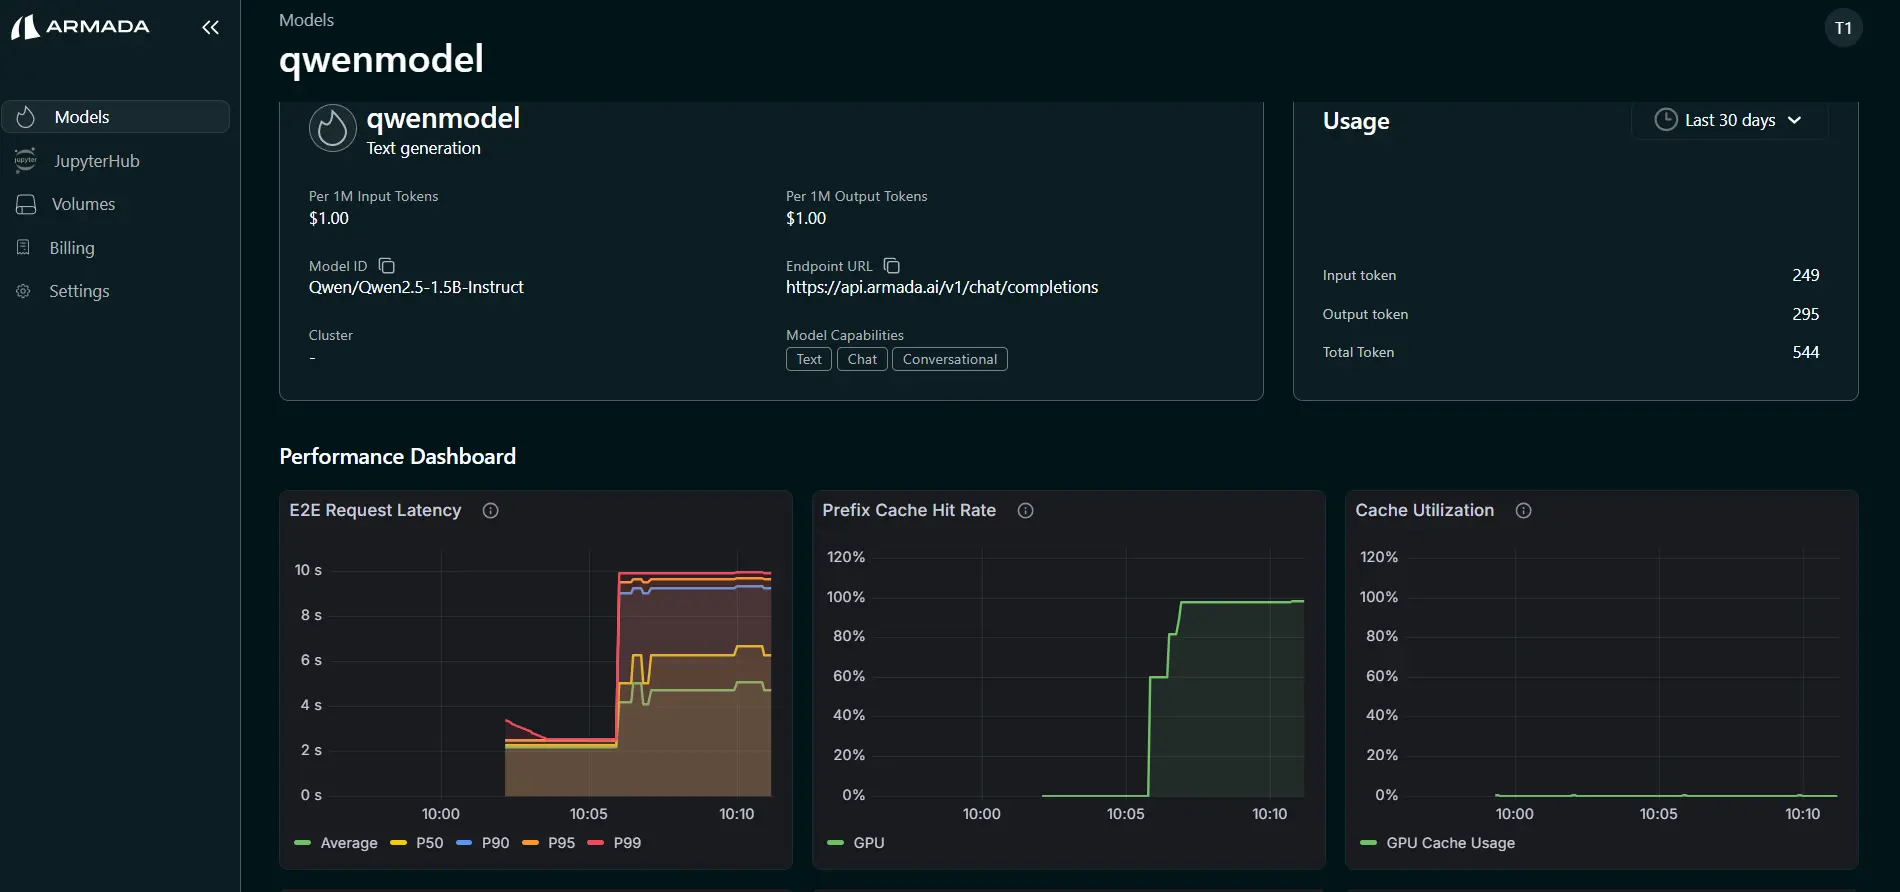
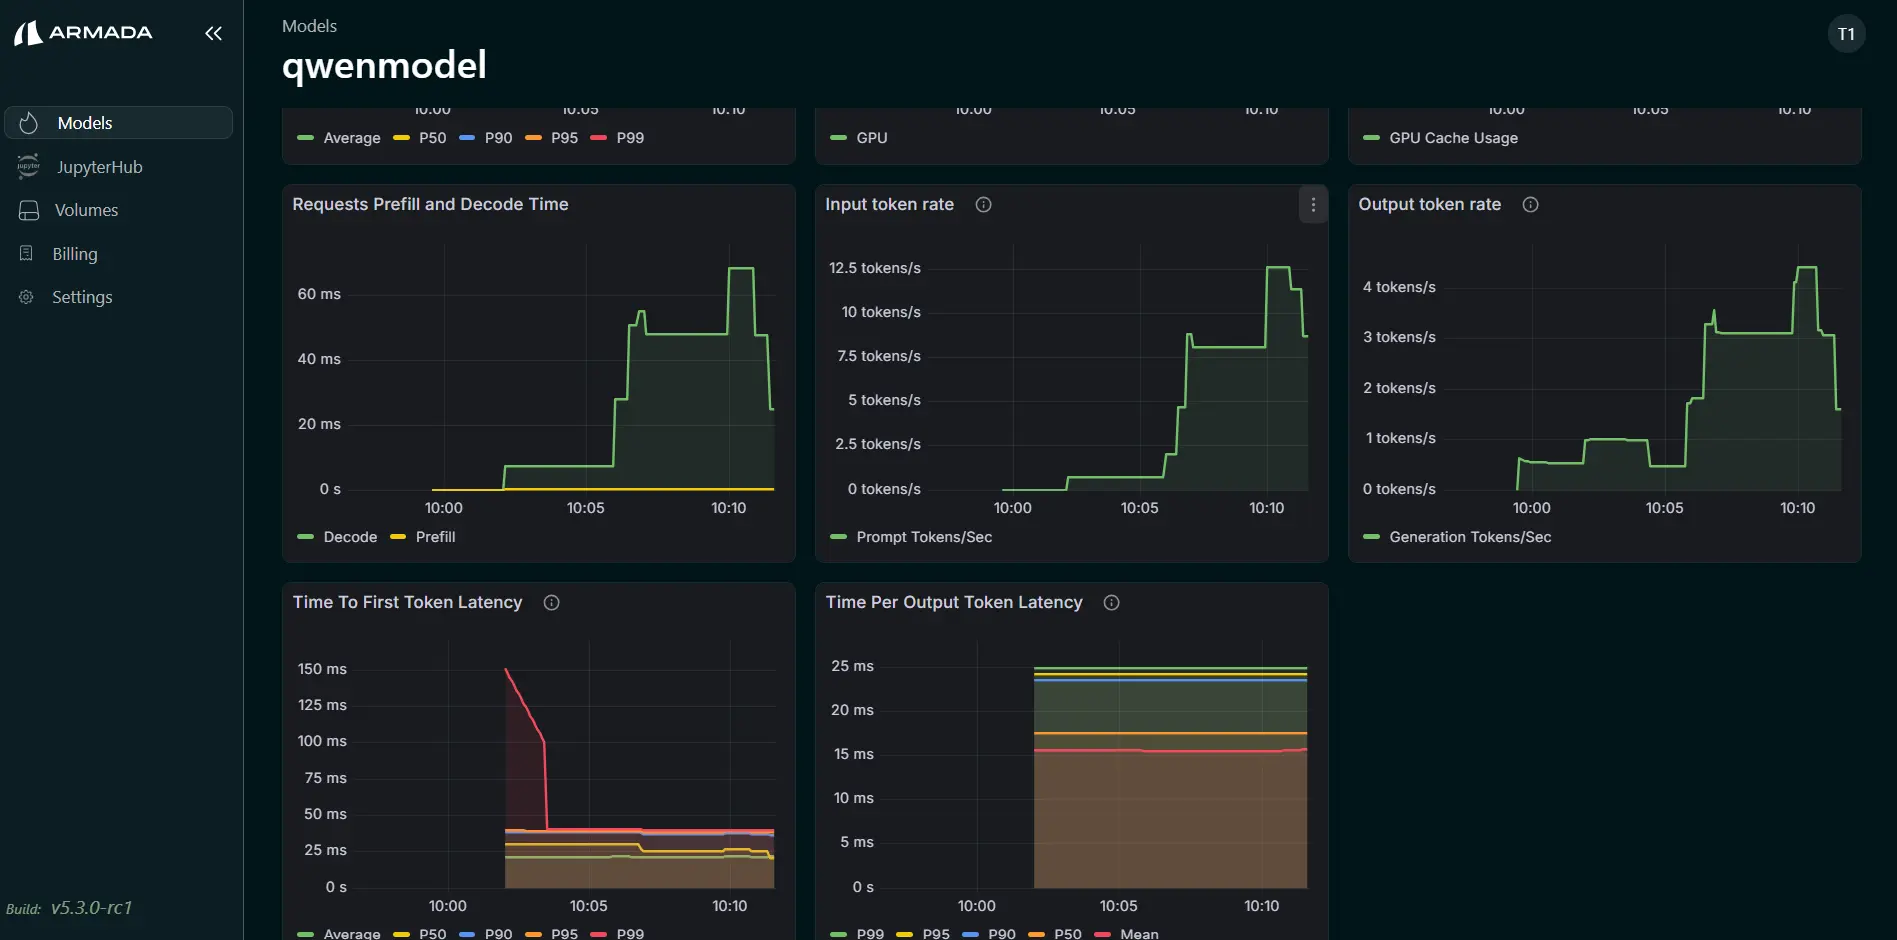
Performance Metrics
Monitor model performance:
- Click on the AI Studio then click View details for the model.
- The following metrics are shown:
- TTFT (Time To First Token)
- TPOT (Time Per Output Token)
- Input Token Rate
- Output Token Rate
- KV Cache Utilization
- Prefix Cache Hit Rate
- End-to-End (E2E) Latency
- Request Prefill Time
- Request Decode Time
Model Logs
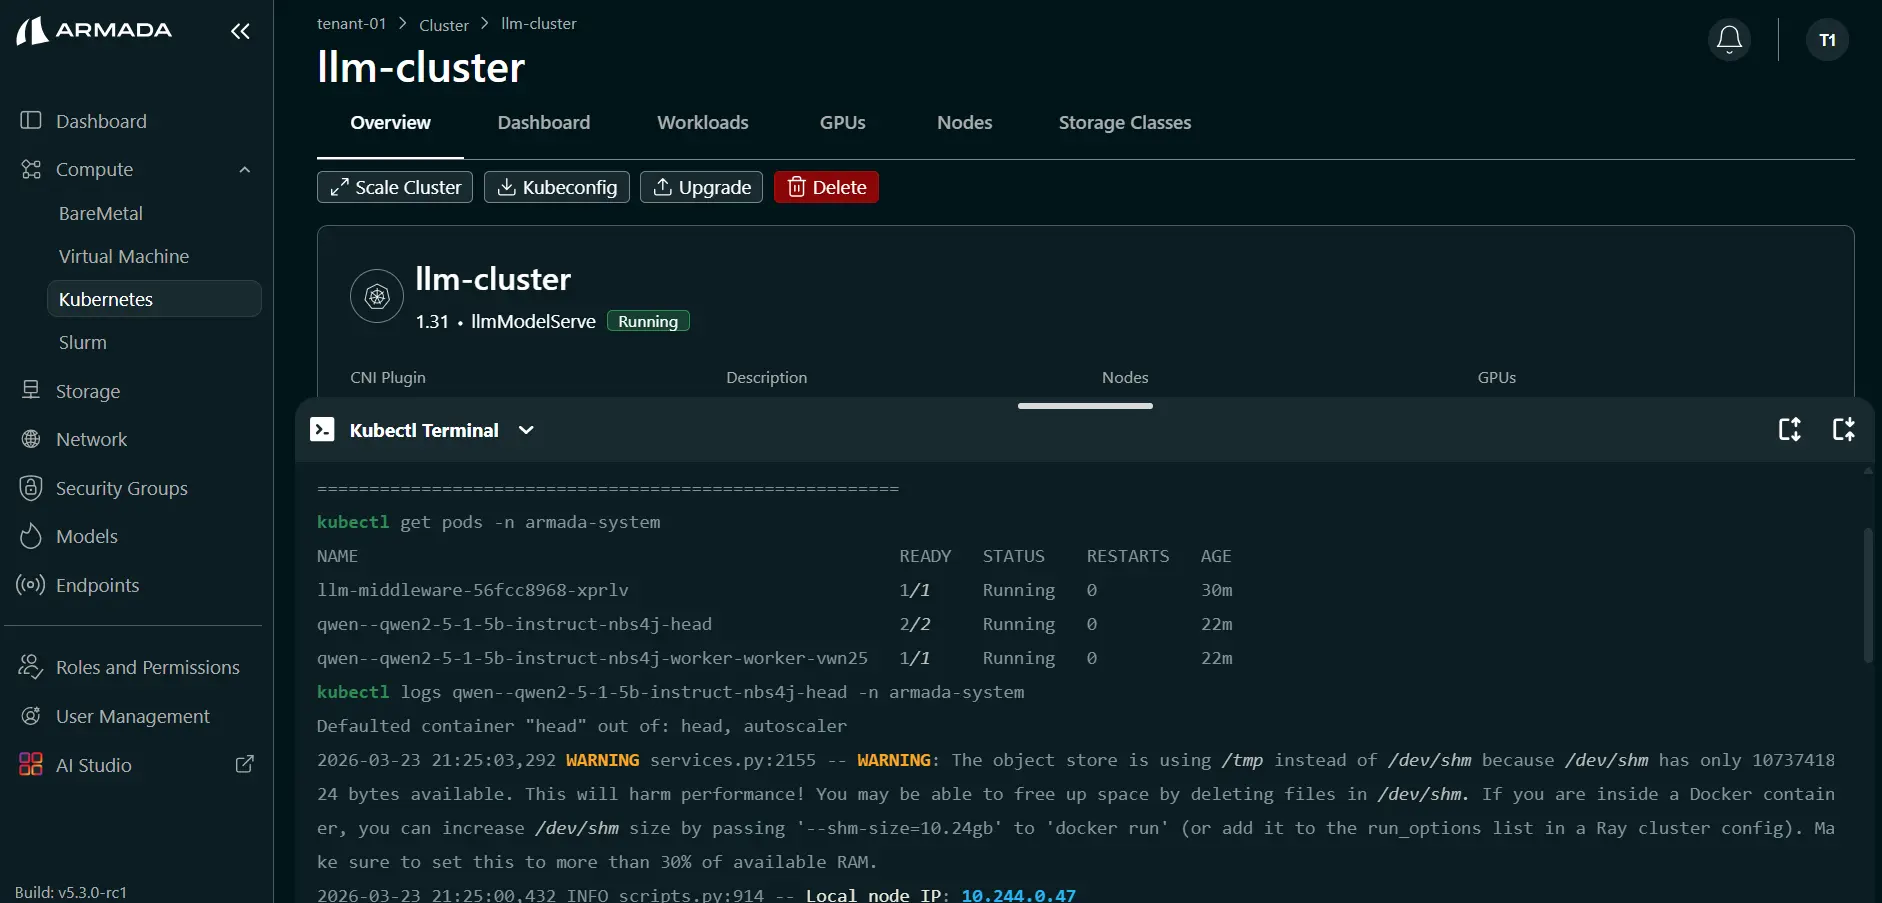
View model serving logs:
kubectl logs deployment/<model-name>
Or through UI:
Scale Model
Add Replicas
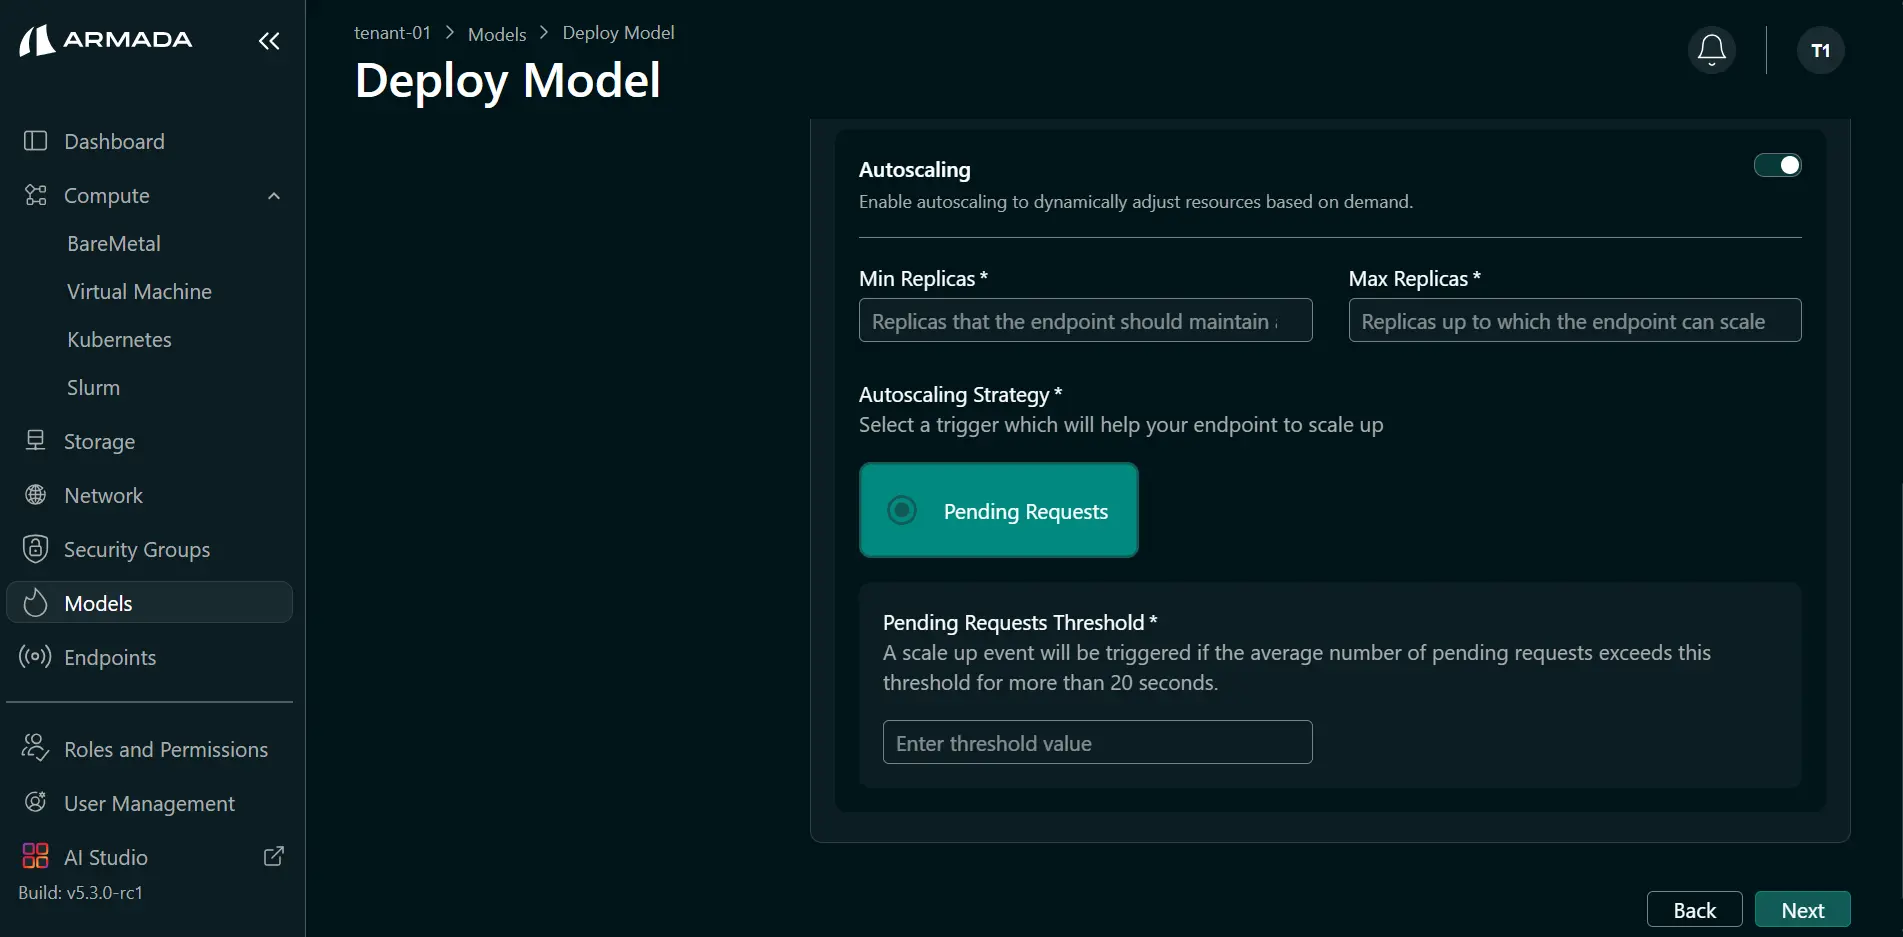
Enable Autoscaling to dynamically adjust resources based on demand:
- Enable Autoscaling to allow replicas to increase based on demand.
- Enter Min replicas and Max replicas.
- Enter the threshold value.
Make Predictions
Via API Endpoint
Call your deployed model:
curl -X POST https://model-endpoint.domain.com/predict \
  -H "Authorization: Bearer API_KEY" \
  -H "Content-Type: application/json" \
  -d '{
    "inputs": [[1.0, 2.0, 3.0, 4.0]]
  }'
Response Format
Model returns predictions:
{
  "predictions": [0.95],
  "confidence": 0.98
}
Best Practices
Model Serving
- Version your models
- Test locally before deployment
- Monitor prediction latency
- Set appropriate resource limits
- Use health checks
Performance
- Batch requests when possible
- Optimize model size
- Use quantization if appropriate
- Monitor GPU/CPU utilization
- Scale based on demand
Security
- Authenticate API access
- Rate limit requests
- Monitor for abuse
- Log all predictions
- Encrypt data in transit